Back to TheWorxHub for Senior Living Main Menu
Creating a Room Booking Event
Watch the Video Tutorial:

To access the Room Booking Calendar:
- Click on the Add button in the top right corner and select Room Booking Request.
- You will be directed to a Calendar showing all bookable rooms for today. There are two available views for navigating the Calendar: Rooms Day View and Rooms Timeline View.
Rooms Day View
This view of the calendar is best for booking when you have a smaller number of rooms to select from. Each room is displayed as a column across the top of the calendar, and appointments can be dragged vertically on the calendar.
- Click the arrows in the top right corner to navigate to a different day.
- Switch to the Month or Week view by using the buttons on the left.
- You can also filter the calendar for just the rooms you want to see. Click the Room Filter button and check the boxes next the room(s) you want to see. TheWorxHub will remember this filter the next time you book a room.
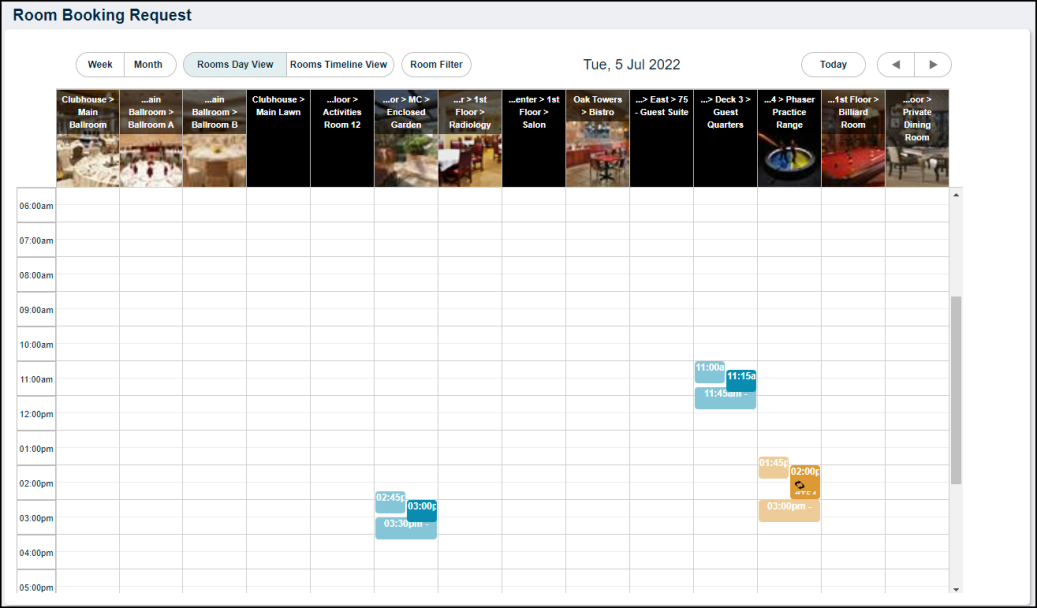
- Click on the desired start time under the room you would like to book and drag down to the desired end time. *Note: If you click and drag to specify the start and end time and the time appearing in the form is incorrect or slightly off, don't worry. When you save the room booking request, you'll be able to manually edit to fine tune your times.
- Click the Next Step button to open the Room Booking Wizard. *Note: If you need to change the rooms, date, or time on this form, click Cancel to go back to the calendar.
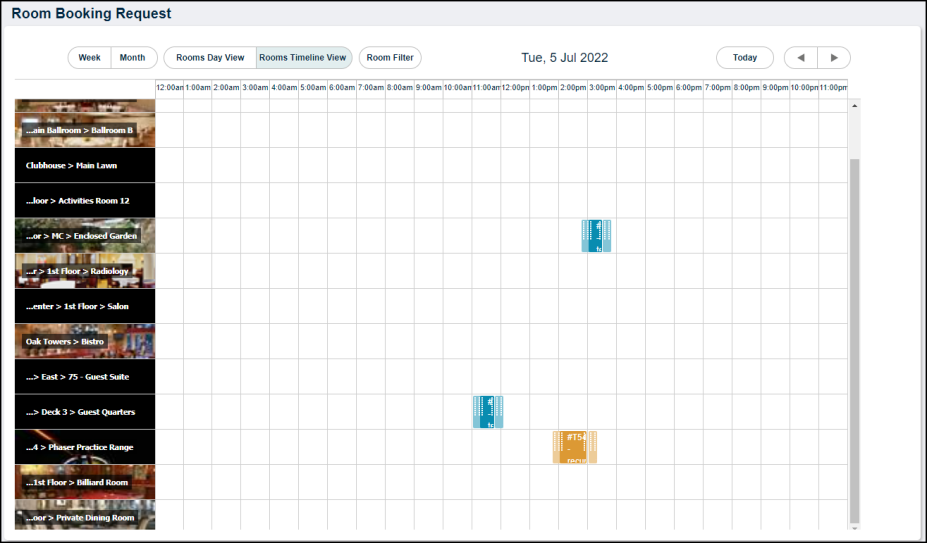
Rooms Timeline View
This view of the calendar is best for booking when you have a larger number of rooms to select from. Each room is displayed as a row on the side of the calendar.
- Click the arrows in the top right corner to navigate to a different day.
- Switch to the Month or Week view by using the buttons on the left.
- You can also filter the calendar for just the rooms you want to see. Click the Room Filter button and check the boxes next the room(s) you want to see. TheWorxHub will remember this filter the next time you book a room.
- Click on the desired start time next to the room you would like to book and drag sideways to the desired end time. *Note: If you click and drag to specify the start and end time and the time appearing in the form is incorrect or slightly off, don't worry. When you save the room booking request, you'll be able to manually edit to fine tune your times.
- Click the Next Step button to open the Room Booking Wizard. *Note: If you need to change the rooms, date, or time on this form, click Cancel to go back to the calendar.
Managing a Conflicting Event
If there is a conflicting event, a warning pop-up window will be displayed.
- Click No to close the warning message and return to the room booking calendar.
- Click Yes to continue to the room booking wizard.
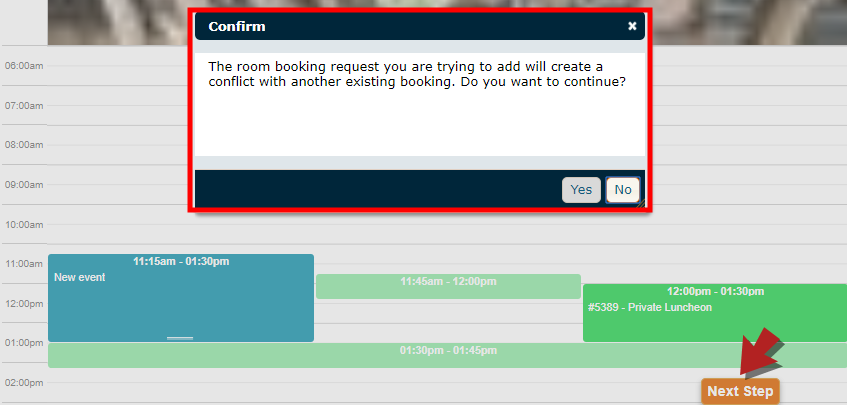
- A warning icon will be displayed to the left of Add Room Booking Request.
- Hover over the icon to display the message, “There are conflicts with this booking.”
- Click on the Booking Conflicts icon to view the conflicting event(s).
Room Booking Wizard
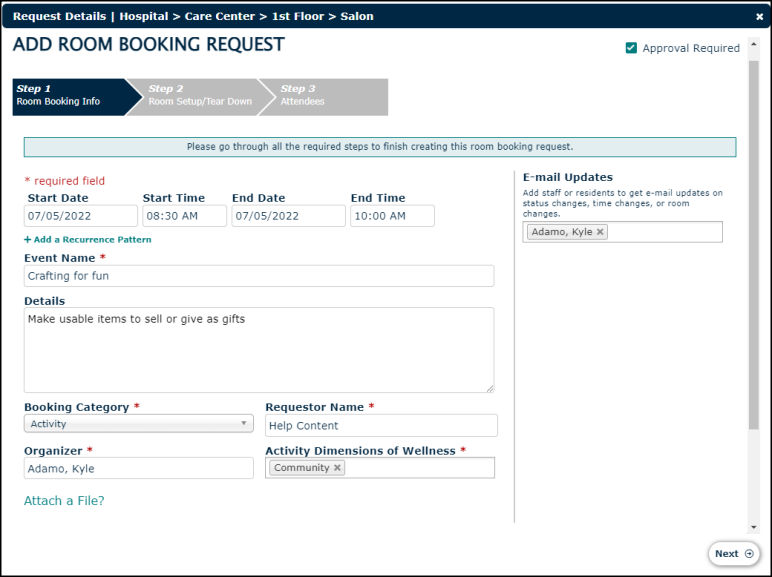
Room Booking Info
- Enter the Event Name.
- Enter the event details in the Details box.
- Select the appropriate Booking Category from the drop down.
- Enter the Requestor Name.
- Enter the name of the Organizer. The organizer is the primary person to receive email notifications for this event. An organizer can be a staff member or a resident.
- Depending on the Booking Category you selected, you may have an additional field to select the Activity Dimensions of Wellness. You can select as many as apply to your event.
- Click the Attach a File? link to expand the Attachments panel.
- Click the Add Files link.
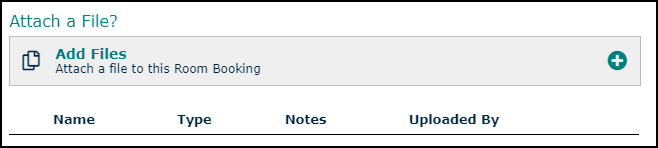
- The File Selection window will display a list of files recently uploaded to the File Library.
Use the Search field to search for additional files.
Check the box for any file you would like to attach to the room booking, then click the Add Files button.
If the file does not currently exist in the library, click the +New File button to attach the file to the room booking.
In the window that appears, choose the source of the attachment. *Note: If a new image or document is attached to the project, it will also be uploaded to the File Library.
Select Choose File to upload a file from your computer.
Select Dropbox to link to a file in a Dropbox account.
Select URL to enter a link to a document or file on a web page.
If you have selected the wrong file, click the Remove link and repeat this process to select the correct file.
Enter a note or description of the file in the optional Notes field, then click the Add Files button.
- Select the names of other staff or residents in the Email Updates field to send them updates on this request.
-
If layouts and configurations have been set up for this room, the Room Capacities and Other Amenities tabs will be displayed in the About this Room section.
- If this event spans over multiple days, or will be a recurring event, click Add a Recurrence Pattern. This will open a window where you can edit the details of your recurrence.
If you have the room booking permission Can Add Room Bookings (No Approval Required), you will be able to bypass the approval process for this room booking by leaving the Approval Required checkbox unchecked. If you do not have this permission, the checkbox will not be visible and the room booking will need to be approved.
- Click Next.
Room Setup/Tear Down
After Step 1 of the wizard has been completed, you can add Room Setup/Tear Down information, reserve equipment for the event, or add catering.
Reserving Equipment
- Click Add New Equipment.
- All available equipment will be listed. Select the item(s) needed and click Done. *Note: Show Unavailable Equipment will display other items that are either booked on other events (indicated with a yellow dot) or out of service (indicated with a red dot).
Adding Room Setup
- Click Add New Setup Task.
- Select the Room Setup Task Template that applies to your event.
- Click Use Selected Template.
- After choosing the template, customize the Description, Details, or upload Attachments if needed.
- Click Add Task to continue. This is will automatically add this task to the calendar before the event and the time needed to complete this task will also be reserved.
- If you need to add multiple setup tasks, determine where in the chain of events they should be done. If you indicate in the Do This Task field that the task should be completed after the previous task is done, the Setup time will be pushed back to accommodate the time needed to complete both tasks. If you select that the task can be done at anytime prior to the event starting, then both tasks will be listed to occur at the same time and the setup window will be booked for the longest setup task.
Adding Room Tear Down
- Click Add New Tear Down Task.
- Select the Room Tear Down Task Template that applies to your event.
- Click Use Selected Template.
- After choosing the template, customize the Description, Details, or upload Attachments if needed.
- Click Add Task to continue.
Catering
- Click Add New Catering Event.
- The Event Date and Must be Ready By fields will automatically populate but can be adjusted as needed.
- Enter the Description, Detail, and Email Notifications.
- Click No Catering Items Added Yet! Click to Add Some! to add catering items.
- Check the boxes next to any catering items you would like to add to the event and click Add Catering Items.
- Adjust the Quantity of the items as needed.
- Click Save Catering.
- When all necessary Event Setup/Tear Down, Equipment Reservations, and Catering items have been added, click Next.
Attendees
This is the final step of the wizard, and allows for the addition of resident or staff attendees, as well as ad hoc attendees. You are also able to define a maximum capacity for the room booking on this step of the wizard.
To add Attendees:
- Begin typing in the Resident or Staff text box and select the appropriate person. *Note: You can search by resident or staff name, or by unit number in this field.
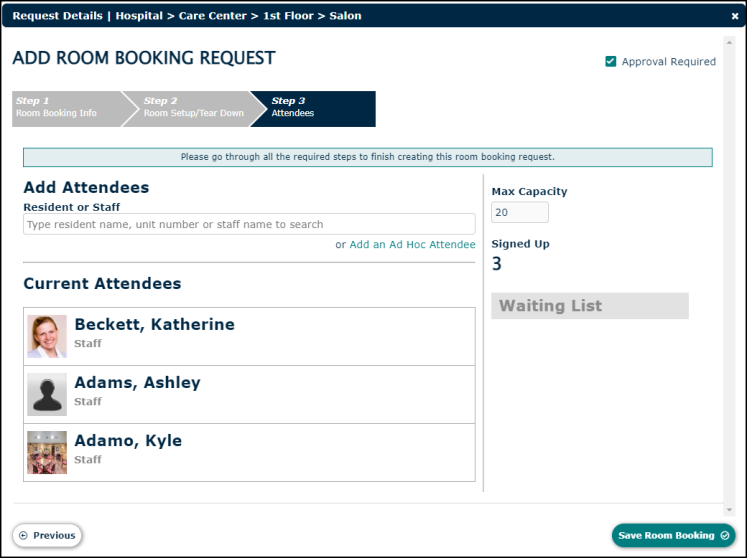
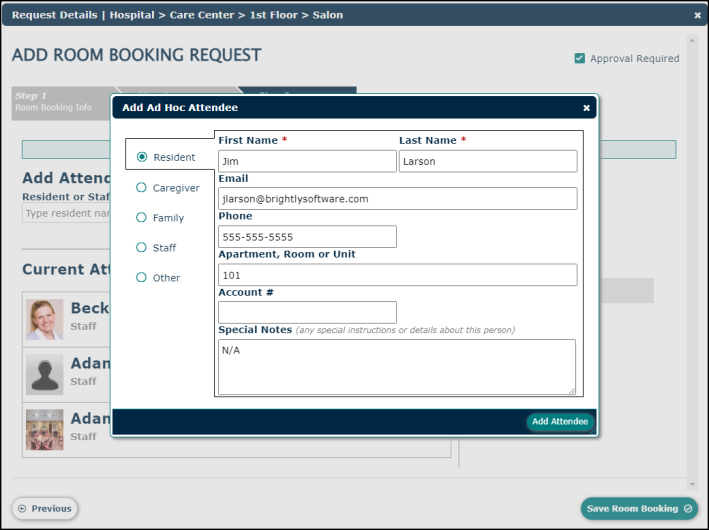
- Add any necessary attendees that are not resident or staff by clicking Add an Ad Hoc Attendee.
- Select the type of attendee and enter any applicable information.
- Click Add Attendee.
- Enter a Max Capacity for this room booking, if applicable.
- Click Save Room Booking. *Note: If this room booking was entered by a user without the Can Add Room Bookings (No Approval Required) permission, the room booking will route to the Room Requests list for approval. Otherwise, the room booking will be considered booked unless the user checked the Approval Required checkbox.
Cloning a Room Booking
Once you have added a Room Booking Request into TheWorxHub and it has been approved, the booking can be cloned to create a new request that is identical to the first. The details from the Room Booking Info tab and Room Setup/Tear Down tab will be copied to the new request.
To clone a room booking:
- Navigate to the Room Booking you'd like to clone. You can access the room booking from the Room Bookings dashboard or the Calendar View.
- Review the booking information and click on the menu icon (
 ) at the bottom of the window.
 - Click on Clone Booking. This will open the calendar view of the room bookings dashboard, where you can use the Rooms Day View or Rooms Timeline View to select the time and date for the cloned booking.
- Once you have defined the date and time for this booking, click Next Step. This will open the room booking wizard.
- Change the Event Name. By default, the Event Name will display as "Copy of...Previous Booking Name".
- Review all other information on the Room Booking Info, Room Setup/Tear Down, and Attendees tabs.
- Once you have made all necessary changes, click Save Room Booking on the Attendees tab.
